
After picking out your perfect window treatments, following the measuring instructions, and placing your order, they have finally arrived at your doorstep. Woo-hoo! There’s only one problem – there’s no handyman included in the box. It looks like it’s up to you to save the day. It is time to transform you into an installation super hero – able to put up a valance in a single bound, and faster than a whirring drill. Look! Up in the recesses of your windows! It’s a blind! It’s a shade! It’s your brand new window treatments!

![]()
First Things First: Prepare
When your blinds or shades arrive, be sure to open and inspect the package to confirm that everything is intact; you’ve received the correct product and there is no hardware missing. This can save you from an unnecessary headache in the future. When laid out, all of the equipment you need to put up your window treatments can seem a bit intimidating. Don’t fret; it’s about blinds, not brain surgery. Most window treatments have specific installation instructions, but there are a few generally applicable tips to help you hang your window treatments. Start with the installation manual, which will give you precise instructions and keep you from drilling any regrettable holes around your window. Once you’ve got window treatments unpacked, and the instructions read, it’s time to find a cordless drill, a screwdriver, and a pencil. With the right tools, you can install new window treatments faster than the speed of light.

![]()
The Racket About Brackets
Take the mounting brackets included with your product and place them, one at a time, on either end of your window. The amount of brackets included with your window treatment usually varies depending on the length of your blind or shade. Generally speaking, there will be a bracket for each side of your product and an extra optional bracket to offer more support for the middle portion. Use a pencil to mark the center of each mounting hole. Accurately marking this space will make the entire process easier and keep you from having to adjust the brackets later. I suggest using a level if you want to be sure that your brackets are straight.

![]()
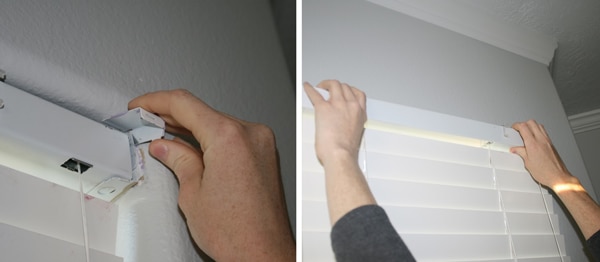
Screw It Up
Once you have the marks on your wall, use a small drill bit to make a tiny opening for each mounting hole. This hole will make it a cinch to screw in the hardware. After these small holes have been drilled, put your mounting brackets back up and drive the included screws through the brackets, into the holes, with a screwdriver. Some customers choose to use their own screws, but that is entirely up to you. For a more secure blind, a longer, stronger screw is always a good idea. Keep turning until only the screw head is visible and your brackets are stable and flush with your wall. Once these brackets are secured, your blinds or shades should be able to slip right in and be successfully mounted. Don’t forget to lock your brackets by closing the small sliding door in front of your window treatments.
![]()

![]()
Finishing Touches
As soon as everything has been properly mounted, there are only a handful of simple tasks left to take care of. These include optional steps like installing your valance, snapping on your tilt wand, or attaching a cleat to your wall to wrangle any dangling cords – all very basic things that shouldn’t be any trouble. You are an installation expert, after all. The final step is the most rewarding: sitting back and enjoying the beauty of your brand new custom window treatments. Bravo!

![]()

![]()